
react初学常见问题
1、react+webpack+ts配置@指向src
创建项目:npx create-react-app projectName --template typescript
通过配置craco来解决这个问题(常用)
安装craco
1
npm i -D @craco/craco
在项目根目录下面添加一个craco.config.ts文件
1
2
3
4
5
6
7
8
9
10
11
12
const path = require('path')
module.exports = {
// webpack 配置
webpack: {
// 配置别名
alias: {
// 约定:使用 @ 表示 src 文件所在路径
'@': path.resolve(__dirname, 'src')
}
}
}
export {}修改package.json中的脚本命令
1
2
3
4
5
6"scripts": {
"start": "craco start",
"build": "craco build",
"test": "craco test",
"eject": "react-scripts eject"
},将原来的
react-scripts修改为craco修改tsconfig.json配置文件
1
2
3
4
5
6
7
8
{
"compilerOptions": {
"baseUrl": "./",
"paths": {
"@/*": ["src/*"]
}
}
}在
compilerOptions配置中添加baseUrl和paths
执行npm run eject来将隐藏的webpack配置文件显示出来然后修改相关配置来解决这个问题
进入创建的项目根目录,解压相关依赖
1
npm run eject
.解压之后,根目录会暴露出config文件夹。找到webpack.config.js → alias,新增 代码:”@”: paths.appSrc
1
2
3alias: {
"@": paths.appSrc,
}重启项目即可
2、react+vite+ts配置@指向src
创建项目
1
npm create vite@latest projectName -- --template react-ts
安装node类型包
1
npm i @types/node -D
修改vite.config.ts配置
1
2
3
4
5
6
7
8
9
10
11
12
13
import { defineConfig } from 'vite'
import react from '@vitejs/plugin-react'
import path from 'path'
// https://vitejs.dev/config/
export default defineConfig({
plugins: [react()],
resolve: {
alias: {
'@': path.resolve(__dirname, './src'),
},
},
})添加alias配置(如上图)
修改tsconfig.app.json文件
1
2
3
4
5
6
7
8
9
10
11
12
13
14
15
16
17
18
19
20
21
22
23
24
25
26
27
28
29
30
31
32
33
34
{
"compilerOptions": {
"target": "ES2020",
"useDefineForClassFields": true,
"lib": [
"ES2020",
"DOM",
"DOM.Iterable"
],
"module": "ESNext",
"skipLibCheck": true,
"baseUrl": ".",
"paths": {
"@/*": [
"src/*"
]
},
/* Bundler mode */
"moduleResolution": "bundler",
"allowImportingTsExtensions": true,
"isolatedModules": true,
"moduleDetection": "force",
"noEmit": true,
"jsx": "react-jsx",
/* Linting */
"strict": true,
"noUnusedLocals": true,
"noUnusedParameters": true,
"noFallthroughCasesInSwitch": true
},
"include": [
"src"
]
}在该配置文件中添加如下配置
1
2
3
4
5
6"baseUrl": ".",
"paths": {
"@/*": [
"src/*"
]
}
3、antd的使用
安装antd
1
npm i antd
在组件中引入antd相应的组件然后使用
注意:版本差异
5.x版本:下载了antd过后,无需引入样式,直接在组件中按需引入组件即可
4.x版本:下载了antd过后,需要index.js中引入antd的全局样式,组件中引入组件才能加载样式,而且需要用户自己配置按需打包
下载less插件(前提安装好craco并配置好craco.config.ts)(看文档最上方)
1
npm i craco-less
craco-less内置了less的所有包
在craco.config.ts中配置less插件
1
2
3
4
5
6
7
8
9
10
11
12
13
14
15
16
17
18
19
const CracoLessPlugin = require('craco-less');
const path = require('path')
module.exports = {
// webpack 配置
webpack: {
// 配置less
plugins: [
{
plugin: CracoLessPlugin
}
],
// 配置别名
alias: {
// 约定:使用 @ 表示 src 文件所在路径
'@': path.resolve(__dirname, 'src')
}
}
}
export {}注意在webpack或vite项目中使用less的时候要把esay-less插件关闭,否者会多生成多余的css文件
antd5.x配置主题,在组件的最外层包裹一个
ConfigProvider并配置主题1
2
3
4
5
6
7
8
9
10
11
12export default function App() {
return (
<ConfigProvider
theme={{
token: {
colorPrimary: '#eeeeee',
},
}}>
......
<ConfigProvider/>
)
}
4、搭建路由
react-router的官方网站:React Router: Declarative Routing for React.js (docschina.org)
下载路由
1
npm i react-router-dom
注意:路由的版本不同写法也会有所不同,目前常用的有
v5和v6两个版本本文使用的是
v6的版本路由的引入和加载
一级路由搭建在App.tsx这个组件中,整个项目启动后,默认访问App组件
先从react-router-dom中引入{ BrowserRouter, Routes, Route }这3个组件
import { BrowserRouter,Routes,Route } from "react-router-dom"在组件结构的最外层,用
BrowserRouter定义一个路由器,然后再在路由器的下面来作Routes的映射1
2
3
4
5
6
7
8
9
10
11
12
13export default function App() {
return (
<>
<BrowserRouter>
<Routes>
<Route path="/login" element={<Login></Login>}></Route>
<Route path="/register" element={<Register></Register>}></Route>
<Route path="/home" element={<Home></Home>}></Route>
</Routes>
</BrowserRouter>
</>
)
}路由重定向
1
2
3
4
5
6
7
8
9
10
11
12
13
14export default function App() {
return (
<>
<BrowserRouter>
<Routes>
<Route path='/' element={ <Navigate to="/home"></Navigate> }></Route>
<Route path="/login" element={<Login></Login>}></Route>
<Route path="/register" element={<Register></Register>}></Route>
<Route path="/home" element={<Home></Home>}></Route>
</Routes>
</BrowserRouter>
</>
)
}当访问
/根路径的时候页面会重定向到home页面配置404页面
1
2
3
4
5
6
7
8
9
10
11
12
13
14
15
16export default function App() {
return (
<>
<BrowserRouter>
<Routes>
<Route path='/' element={ <Navigate to="/home"></Navigate> }></Route>
<Route path="/login" element={<Login></Login>}></Route>
<Route path="/register" element={<Register></Register>}></Route>
<Route path="/home" element={<Home></Home>}></Route>
<Route path="/404" element={<NotFound></NotFound>}></Route>
<Route path="*" element={<Navigate to="/404"></Navigate>}></Route>
</Routes>
</BrowserRouter>
</>
)
}当所有路由都没有匹配上的时候会走最下面的一个路由,这个路由又重定向到了
/404,最终显示NotFound组件注意:
*路由要写在最下面index的使用
如果在某个路由映射上加上了一个index例如
<Route index path="/login" element={<Login></Login>}></Route>那么到我们访问/的时候会自动重定向到Login页面注意:同一级路由中只能有一个
indexreset.css
常见标签默认样式的清除
1
2
3
4
5
6
7
8
9
10
11
12
13
14
15
16
17
18
19
20
21
22
23
24
25
26
27
28
29
30
31
32
33
34
35
36
37
38
39
40
41
42
43html, body, div, span, applet, object, iframe,
h1, h2, h3, h4, h5, h6, p, blockquote, pre,
a, abbr, acronym, address, big, cite, code,
del, dfn, em, img, ins, kbd, q, s, samp,
small, strike, strong, sub, sup, tt, var,
b, u, i, center,
dl, dt, dd, ol, ul, li,
fieldset, form, label, legend,
table, caption, tbody, tfoot, thead, tr, th, td,
article, aside, canvas, details, embed,
figure, figcaption, footer, header, hgroup,
menu, nav, output, ruby, section, summary,
time, mark, audio, video {
margin: 0;
padding: 0;
border: 0;
font-size: 100%;
font: inherit;
vertical-align: baseline;
}
/* HTML5 display-role reset for older browsers */
article, aside, details, figcaption, figure,
footer, header, hgroup, menu, nav, section {
display: block;
}
body {
line-height: 1;
}
ol, ul {
list-style: none;
}
blockquote, q {
quotes: none;
}
blockquote:before, blockquote:after,
q:before, q:after {
content: '';
content: none;
}
table {
border-collapse: collapse;
border-spacing: 0;
}搭建二级路由
只需要在一级路由中嵌套并指定渲染出后即可
注意:二级路由的path不要写
/1
2
3
4
5
6
7
8
9
10
11
12
13
14
15
16
17
18
19export default function App() {
return (
<>
<BrowserRouter>
<Routes>
<Route path='/' element={ <Navigate to="/home"></Navigate> }></Route>
<Route path="/login" element={<Login></Login>}></Route>
<Route path="/register" element={<Register></Register>}></Route>
<Route path="/home" element={<Home></Home>}>
<Route index path="data" element={<Data></Data>}></Route>
<Route path="tag" element={<Tag></Tag>}></Route>
</Route>
<Route path="/404" element={<NotFound></NotFound>}></Route>
<Route path="*" element={<Navigate to="/404"></Navigate>}></Route>
</Routes>
</BrowserRouter>
</>
)
}上面代码中,在
home的子路由中的data路由映射上我添加了index,也就是说,在访问/home的时候会重定向到data页面除此之外,还有一个非常重要的一步,那就是指定路由渲染出口(要指定子路由的出口应该在其父路由中添加路由出口)
1
2import { Outlet } from 'react-router-dom'
//然后在指定的位置添加<Outlet></Outlet>
5、hooks编程
useState
useMemo(计算属性)(常用)
1
2
3const newPassword = useMemo(() => {
......
},[password])其中数组中存放的是监控的数据,也就是数组中的数据变化时,上面的计算属性会执行一次
注意如果不加这个数组,只要页面上的数据产生变化,计算属性都要执行一次
useCallback(计算属性)
1
2
3const newPassword = useCallback(() => {
......
},[password])上面两个计算属性的区别
useMemo返回的是计算的结果,直接使用
useCallback返回的是一个函数,这个函数需要调用一次
useCallback真实应用 场景,以后在父子组件传递函数的时候会用
useEffect副作用
作用:
- 使用useEffect完成watch监听效果
- 实现生命周期函数
模拟componentDidMount
1
2
3useEffect(() => {
...
},[])传递的参数为空数组的时候,默认就是挂载完毕后执行
模拟更新componentDidUpdate watch
1
2
3useEffect(() => {
console.log('password', password);
},[password])只要password数据发生变化就会执行,并可以拿到更新之后的数据
……
useRef
useRef是一个Hook,它可以用来存储一个可变的值,这个值在组件的整个生命周期内保持不变。useRef返回一个可变的ref对象,其.current属性被初始化为传递给useRef的参数(initialValue)。返回的对象将在组组件的整个生命周期内持续存在。
两个主要用途:
- 访问DOM结点:当你需要直接访问一个DOM结点时,你可以使用ref来获取对该结点的直接引用。
- 存储任意可变值:如果你需要跨渲染保持一个可变值,而这个值不应该引起组件的重新渲染时,可以使用ref。
1. 访问DOM结点的例子:
> 实现点击按钮,将光标聚焦到input输入框中
1
2
3
4
5
6
7
8
9
10
11
12
13
14
15
import { useRef } from 'react'
export default function UseRefDemo() {
const onBtnClick = () => {
inputEl.current?.focus();
}
const inputEl = useRef<HTMLInputElement>(null);
return (
<div>
<input ref={inputEl} type="text" />
<button onClick={onBtnClick} >Focus</button>
</div>
)
}
2. 存储任意可变值
> 疑问:为什么使用通过useRef生成的一个值的时候,既然它也不能实现响应式,那么为什么要使用这个hook呢?为什么不直接使用let或者const来声明呢?
>
> > 解释:当我们使用let或const来声明一个变量的时候,当这个组件重新渲染的时候,这个变量就会被重新赋值,而通过useRef生成的一个值,当页面重新渲染的时候,它任然保留他当前的值,不会被重新初始化。
6、文件上传
上传 Upload - Ant Design (antgroup.com)
注意点:
name属性的值要和后端接口文档保持一致
beforeUpload函数在文件上传之前做一些操作(可以判断文件格式和验证文件大小等)
handleChange函数文件启动上传操作后执行(可以处理正在上传中和上传成功后的相关操作)
上传图片并在页面上显示出来的思路:
前端将获取到的文件通过
getBase64(file,(url) => {
})函数,将上传的图片编码成base64格式,把这个编码后的字符串放到img的src中可以直接显示到浏览器中.
其他内容请看官方文档:上传 Upload - Ant Design (antgroup.com)
二维码生成网站:草料二维码生成器 (cli.im)
7、路由跳转
通过Link标签来进行跳转,属于超链接跳转
1
<Link to="/home/user"></Link>
通过hook来进行跳转
1
2
3
4import { useNavigate } from "react-router-dom"
const navigate = useNavigate();
//可以通过navigate('路径')来进行跳转这样会记录浏览历史
//navigate('路径',{replace:true})跳转后没有历史记录
8、路由传参
在路径后面通过
?拼接参数来实现传参通过useSearchParams来获取参数
1
2
3import { useSearchParams } from "react-router-dom"
const [searchParams,setSearchParams] = useSearchParams();
const id = searchParams.get('id');传递一个对象
1
2
3navigate('路径', {
state: {id: userId}
})1
2
3import { useLocation } from "react-router-dom"
const location = useLocation();
const id = location.state.id;动态路由参数
1
2//路由配置
xxx/:pid1
navigate('路径/100')
1
2
3import { useParams } from "react-router-dom"
const params = useParams();
console.log(params.pid);
9、授权操作
todo…
10、路由懒加载+配置式路由
路由懒加载
需要在路由器组件外面嵌套一个React官方的懒加载组件
1
2
3
4
5<React.Suspense fallback={<div>加载中。。。</div>}>
<BrowserRouter>
</BrowserRouter>
</React.Suspense>fallback: 加载过程中,如果比较慢的情况。我们可以执行额外的提示信息
指定哪个组件需要懒加载
1
2
3
4// 动态引入
const Register = React.lazy(()=>import("./pages/Register"))
// 路由配置
<Route path='/register' element={<Register/>}></Route>如何检测自己的懒加载是否配置成功:
可以在浏览器网络里面,根据请求服务器的文件,来检测懒加载是否配置成功。
如果么有懒加载文件,所有的资源将会被一次性打包成bundle.js文件
如果你的某一个组件懒加载,初次打包不会将这个组件打包到bundle.js中,只有当访问这个组件的时候才会动态的加载出这个组件,对应的当你访问这个路由组件的时候,我们可以在浏览器的网络中看到新增了一个xxx.js的文件。
自定义加载中的组件
在上面的例子中我只是使用了一个
<div>加载中。。。</div>来显示加载缓慢时的提示效果。在这里我们可以自定义一个组件来展示这个提示效果。定义一个
Loading.tsx组件1
2
3
4
5
6
7import React from 'react'
export default function Loading() {
return {
//这里可以自定义加载中的动画效果
<div>Loading...</div>
}
}在组件中引入并使用
1
2
3
4
5
6
7
8
9
10
11
12import Loading from './components/Loading'
export default function App() {
return (
<>
<React.Suspense fallback={<Loading></Loading>}>
<BrowserRouter>
</BrowserRouter>
</React.Suspense>
</>
)
}
配置式路由
新建
src/router/index.ts编写路由配置
1
2
3
4
5
6
7
8
9
10
11
12
13
14
15
16
17
18import Login from '../pages/Login'
import Register from '../pages/Register'
import Home from '../pages/Home'
import Main from '../pages/Main'
import User from '../pages/User'
import NotFound from '../pages/NotFound'
const routes = [
{path:'/login',element:<Login/>},
{path:'/register',element:<Register/>},
{path: '/home',element:<Home/>,
children: [
{path: 'main',element:<Main/>},
{path: 'user',element:<User/>}
]
},
{path: '/*',element: <NotFound/>}
]
export default routes这里举了个简单的例子
改成配置式路由后该如何使用呢?
基本思路:其实就是将原有的路由配置删掉,然后利用上面编写的路由配置文件,通过代码来动态生成与之前一摸一样的结构。这时我们一般会设置一个组件,在这个组件中动态生成好路由配置结构,然后放到对应位置即可。
编写一个动态生成路由配置结构的组件
DynamicRouter.tsx1
2
3
4
5
6
7import routes from '../router'
import { useRoutes } from 'react-router-dom'
export default function DynamicRouter() {
// 如果要做权限控制,就在这里来编写逻辑
const elements = useRoutes(routes);
return elements;
}这里用到了
useRoutes钩子,这个hook可以帮助我们通过路由配置文件来生成对应的路由配置结构。当然自己也可以通过递归来实现这个操作,但是比较复杂。在App.tsx根组件中动态引入
1
2
3
4
5
6import DynamicRouter from '@components/DynamicRouter'
<React.Suspense fallback={<Loading></Loading>}>
<BrowserRouter>
<DynamicRouter></DynamicRouter>
</BrowserRouter>
</React.Suspense>
11、路由守卫+动态路由
路由守卫
应用场景举例: 防止用户在未登录的情况下通过输入url来非法跳转到其他页面
在
router下面编写一个RouterAuth.tsx组件1
2
3
4
5
6
7
8
9
10
11
12
13
14
15
16
17
18import React from 'react'
import { Navigate, useLocation } from 'react-router-dom'
const getToken = () => {
return localStorage.token
}
function RouterAuth({ children }) {
const location = useLocation();
const token = getToken();
const currentPath = location.pathname;
if (token && currentPath === '/loginAndRegister') {
return <Navigate to='/home/data' />;
}
if (!token && currentPath !== '/loginAndRegister') {
return <Navigate to="/loginAndRegister" />;
}
return <>{children}</>;
}
export default RouterAuth;1
2
3
4
5
6
7
8
9
10
11
12
13
14
15
16
17
18
19
20
21
22
23
24
25import React from 'react';
import { Navigate, useLocation } from 'react-router-dom';
const getToken = (): string | null => {
return localStorage.getItem('token');
}
interface RouterAuthProps {
children: React.ReactNode;
}
const RouterAuth: React.FC<RouterAuthProps> = ({ children }) => {
const location = useLocation();
const token = getToken();
const currentPath = location.pathname;
if (token && currentPath === '/loginAndRegister') {
return <Navigate to='/home/data' />;
}
if (!token && currentPath !== '/loginAndRegister') {
return <Navigate to="/loginAndRegister" />;
}
return <>{children}</>;
}
export default RouterAuth;解释:这里的children是用户想要跳转至的路由页面组件
在
router/index.ts路由配置文件中1
2
3
4
5
6
7
8
9
10
11
12
13
14
15
16
17
18
19
20import Login from '../pages/Login'
import Register from '../pages/Register'
import Home from '../pages/Home'
import Main from '../pages/Main'
import User from '../pages/User'
import NotFound from '../pages/NotFound'
//导入RouterAuth组件
import RouterAuth from './RouterAuth'
const routes = [
{path:'/login',element:<Login/>},
{path:'/register',element:<Register/>},
{path: '/home',element:<RouterAuth><Home/></RouterAuth>,
children: [
{path: 'main',element:<Main/>},
{path: 'user',element:<User/>}
]
},
{path: '/*',element: <NotFound/>}
]
export default routes关注
RouterAuth组件的使用这样处理完毕后,当用户访问
/home或/home/xxx的时候都会跳转到Login页面。
动态路由
请回看上方10->配置时路由->3中动态生成路由的组件
1 | import React from 'react' |
这样我们就可以实现通过后端返回的用户的权限信息来动态展示用户可以查看的路页面。
潜在问题:由于上方我们是直接修改的原始数据(import导入进来的routes),那么当我们没有刷新页面的情况下切换了另一个新的登录用户此时育有import语句没有再次执行只是单纯执行了
DynamicRouter函数,所以此时显示的路由还是上一个登录用户的权限路由,只有当我们刷新了页面之后才正常。解决方案:我们可以
深拷贝一份导入进来的routes然后来修改这个深拷贝后数据。
自定义一个深克隆函数(实现思路:递归)
2
3
4
5
6
7
8
9
10
11
12
13
14
15
16
17
18
19
20
if (obj === null) return obj;//如果是null或者undefined就不进行拷贝操作
if (obj instanceof Date) return new Date(obj);//如果是一个日期就新生成一个日期然后返回
if (obj instanceof RegExp) return new RegExp(obj);//如果是一个正则就新生成一个正则然后返回
// 可能是对象或者普通的值 如果是函数的话就不需要深拷贝
if (typeof obj !== 'object') return obj;
// 是对象的话就需要进行深拷贝
if (hash.get(obj)) return hash.get(obj);
let cloneObj = new obj.constructor();
// 找到的是所属类原型上的constructor,而原型上的constructor指向的是当前类本身
hash.set(obj, cloneObj);
for (let key in obj) {
if (obj.hasOwnProperty(key)) {
// 实现一个递归拷贝
cloneObj[key] = deepClone(obj[key], hash);
}
}
return cloneObj;
}
export default deepClone;探究Map的用法。
12、react可视化图表的使用(echarts)
下载依赖包
1
npm i echarts-for-react
一般在下载
echarts-for-react这个包的时候会默认下载echarts这个包,如果我们在package.json中没有找到echarts这个包,要通过执行npm i echarts来进行安装。echarts在react项目中的使用
1
2
3
4
5
6
7
8
9
10
11
12
13
14
15
16
17
18
19
20
21
22
23
24
25
26
27
28
29
30import React from 'react'
import EchartsReact from 'echarts-for-react'
export default function Demo() {
const getOption = () => {
return {
xAxis: {
type: 'category',
data: ['Mon','Tue','Web','Thu','Fri','Sat','Sun']
},
yAxis: {
type: 'value'
},
series: [
{
data: [150,230,224,218,135,147,260],
type: 'line'
}
]
}
}
return (
<div>
<EchartsReact
option = {getOption}
style={{height:'300px',width:'50%'}}
className="react_for_echarts">
</EchartsReact>
</div>
)
}
13、redux状态机
下载依赖
1
npm i redux
创建
src/redux/index.ts1
2
3
4
5
6
7
8
9
10
11
12
13
14
15
16
17
18
19
20
21
22
23import {legacy_createStore as createStore} from 'redux'
// 创建仓库对象
const store = createStore(reducer)
// 创建action对象
const action = {
type: "increment",
payload: 100;
}
// 编写reducer函数
function reducer(state = { count: 100 }, action) {
switch (action.type) {
case "increment":
state.count += action.payload
return {...state}
case "decrement":
state.count -= action.payload
return {...state}
default:
return state
}
}
// 触发事件.派发action对象给reducer修改仓库
store.dispatch(action);这里的state = { count: 100 }是给定默认值
reducer初始化仓库,修改仓库数据,第一次初始化redux默认派发一个action过来,此时会走default。第二次reducer接收自己派发的action对象,按照自己规则来修改。
reducer是一个纯函数
redux和reducer部分详细请看官方文档:入门 Redux | Redux 中文官网
redux在实际项目中的应用:
redux/index.ts
index.ts
1 | import { legacy_createStore as createStore } from 'redux' |
redux/actions
CountAction.ts
1
2
3
4
5
6
7
8
9
10
11
12
13
14
15
16
17
18
19
20
21
22
23
24
25
26
27/*const action1 = {
type: 'INCREMENT',
payload: 100
}
const action2 = {
type: 'DECREMENT',
payload: 200
}
export {
action1,
action2
}*/
export enum CountActionType {
INCREMENT = 'INCREMENT',
DECREMENT = 'DECREMENT'
}
const CountActionCreators = (type: CountActionType, payload:any) => {
return {
type: type as ActionType,
payload
}
}
export {CountActionType,CountActionCreators};
//使用
/*import { CountActionType,CountActionCreators } from 'xxx/CountAction.ts'
store.dispatch(CountActionCreators(CountActionType.INCREMENT, 100))*/……
redux/reducers
CountReducer.ts
1
2
3
4
5
6
7
8
9
10
11
12
13function CountReducer(state = { count: 100 }, action) {
switch (action.type) {
case "INCREMENT":
state.count += action.payload
return {...state}
case "DECREMENT":
state.count -= action.payload
return {...state}
default:
return state
}
}
export default CountReducer这里的state = { count: 100 }是给定默认值
UserReducer.ts
1
2
3
4
5
6
7
8
9
10
11
12
13
14const state = {id:1,name:'zhangsan',role:'超级管理员'}
function UserReducer(state,action) {
switch(action.type) {
case 'UPDATEUSER':
state.user = action.payload
return {...state}
case "INITUSER":
state.user = action.payload
return {...state}
default:
return state
}
}
export default UserReducer思考一个问题:
我们在redux/index.ts中createStore里面只能传递一个reducer,上面我们通过不同的业务逻辑窜进了不同的reducer。
此时,我们就需要将这两个reducer合并成一个reducers。
新建
reducers/index.ts1
2
3
4
5
6
7import CountReducer from './CountReducer'
import UserReducer frm './UserReducer'
import {combineReducers} from 'redux'
export default combineReducers({
CountReducer,
UserReducer
})修改
redux/index.ts1
2
3
4
5import { legacy_createStore as createStore } from 'redux'
import reducers from './reducers'
import { action1, action2 } from './actions/CountAction'
const store = createStore(reducers);
export default store;
react-redux的使用
由于我们在组件中使用store的时候都需要先引入。我们想在全局引入这个store。
安装react-redux
1
npm i react-redux
在项目入口文件index.ts中
1
2
3
4
5
6
7import store from './redux'
import { Provider } from 'react-redux'
root.render(
<Provider store={store}>
<App/>
</Provider>
)被Provider包裹的所有组件,以后默认都可以使用仓库,无需引入
在组件中获取仓库数据
1
2
3
4
5
6
7
8
9
10
11
12import React from 'react'
import {useDispatch,useSelector} from 'react-redux'
import { CountActionType,CountActionCreators } from 'xxx/CountAction.ts'
export default function Demo() {
// reduxData就是仓库中的数据
const reduxData = useSelector(state => {
return state
})
// 在组件中调用dispatch派发action
const dispatch = useDispatch();
dispatch(CountActionCreators(CountActionType.INCREMENT, 100))
}
redux中间件
目前redux中无法处理异步请求,如果要让redux能够处理请求。需要引入redux中间件,redux三个模块提供整个redux工作流程,额外提供扩展中间件的能力。
常见中间件:
- redux-logger:提供日志输出的中间件
- redux-thunk:处理异步请求的中间件(难度小)
- redux-saga: 处理异步请求的中间件(难度大)
举例:
下载中间件
1
npm i redux-thunk
需求:要在action中通过向后端发请求然后拿到数据后,然后再派发请求reducer
1
2
3
4
5
6
7
8
9
10
11export const initRoleAction = (value) => {
return async (dispatch) => {
const res = await findAllRole()
console.log(res)
//拿到后端数据后,再派发请求reducer
dispatch({
type: 'UPDATEROLE',
payload: res.data.data
})
}
}到
redux/index.ts中应用中间件1
2
3
4
5import { legacy_createStore as createStore,applyMiddleware } from 'redux'
import reducers from './reducers'
import reduxThunk from 'redux-thunk'
const store = createStore(reducers, applyMiddleware(reduxThunk))
export default store;
14、身份认证
todo…
15、自定义hooks函数
要求:
- 自定义的函数必须以use开头
- 函数内部默认不要返回tsx代码,返回对应操作数据
新建
src/hooks/useRequest.ts举例:实现一个从后端请求数据,并将数据存入store仓库中的hook
1
2
3
4
5
6
7
8
9
10
11
12
13import {useDispatch} from 'react-redux'
const useRequest = () => {
const dispatch = useDispatch()
//发送请求获取服务器的数据
const getUsers = async() => {
const res = await findAlluser()
if (res.data.code) {
dispatch(MyUserActionInit(res.data.data))
}
}
return { getUsers }
}
export default useRequest;在组件中使用:先引入useRequest,然后const {getUsers} = useRequest();
注意上面只是一个简单的例子,部分函数没有给出。
16、React性能优化
父组件中的数据变化时,父组件中用到的子组件也会更新,即使
原因:当父组件中的数据发生变化的时候,父组件的
return中所有的内容都会重新渲染一遍优化方法:在子组件中向外暴露子组件的时候利用
export default React.memo(子组件)的方式来优化这个问题1
2
3
4
5
6
7import React,{useEffect} from 'react'
function Children() {
return (
<div>Children</div>
)
}
export default React.memo(Children)todo…
17、将antd中的menu和路由绑定
给
menu绑定一个onClick事件1
<Menu theme="dark" defaultSelectedKeys={['1']} mode="inline" items={items} onClick={clickMenu} />
导入
useNavigate并实例化一个navigate对象1
2import { Outlet, useNavigate } from 'react-router-dom';
const navigate = useNavigate();编写
onClick处理函数1
2
3const clickMenu = (e: { key: React.Key }) => {
navigate(e.key as string, { replace: true })
}
18、封装懒加载的函数
使用场景:在编写路由配置文件
router/index.tsx的时候,要懒加载一个组件的时候需要这么写const Home = lazy(() => import('@/pages/Home/Home')) as React.LazyExoticComponent<() => JSX.Element>;,由于需要进行懒加载的组件很多,那么就要写很多这样的代码显得很臃肿
1 | const lazyImport = (LazyComponents: string[]) => { |
使用这个函数来懒加载组件
2
3
4
5
6
7
8
'NotFound',
'Home',
'Data',
'Tag',
'Learn',
'LoginAndRegister'
])
19、封装懒加载组件时的Loading组件
封装一个
LazyImportComponent.tsx组件1
2
3
4
5
6
7
8
9
10
11import Loading from '@/components/Loading'
import React, { LazyExoticComponent } from 'react'
export const LazyImportComponent = (props: {
lazyChildren: LazyExoticComponent<() => JSX.Element>;
}): React.ReactElement => {
return (
<React.Suspense fallback={<Loading />}>
<props.lazyChildren />
</React.Suspense>
)
}封装一个
Loading组件来展示加载中的效果1
2
3
4
5
6
7
8
9
10
11
12
13
14
15
16import React from "react";
import { Button, Flex } from 'antd';
const Loading: React.FC = () => {
return (
<Flex gap="small" vertical>
<Flex gap="small" align="center" wrap>
<Button type="primary" loading>
Loading
</Button>
</Flex>
</Flex>
);
};
export default Loading;备注:这里return中的内容是我引用的antd
Loading组件使用举例:
1
2
3
4
5
6
7
8
9
10
11
12
13
14
15
16
17
18
19
20
21
22
23
24
25
26
27
28
29
30
31
32const routes: IRouteType.IRouter[] = [
{
path: '/',
element: <Navigate to='/home/data'></Navigate>
},
{
path: '/home',
element: <LazyImportComponent lazyChildren={Home} />,
children: [
{
path: 'learn',
element: <LazyImportComponent lazyChildren={Learn} />
},
{
path: 'data',
element: <LazyImportComponent lazyChildren={Data} />
},
{
path: 'tag',
element: <LazyImportComponent lazyChildren={Tag} />
}
]
},
{
path: '/loginAndRegister',
element: <LazyImportComponent lazyChildren={LoginAndRegister} />
},
{
path: '/*',
element: <NotFound />
}
];这样处理可以实现在加载单独某一个子组件的时候会在子组件展示的区域显示Loading加载中的提示。
直接在App.tsx中这样写
1
2
3
4
5
6
7
8
9
10
11
12
13
14
15
16
17import { Suspense } from 'react';
import { BrowserRouter } from 'react-router-dom';
import './App.css';
import Loading from './components/Loading';
import DynamicRouter from './utils/DynamicRouter';
function App() {
return (
<Suspense fallback={<Loading />}>
<BrowserRouter>
<DynamicRouter></DynamicRouter>
</BrowserRouter>
</Suspense>
);
}
export default App;只是在加载整个页面的时候会有这个Loading加载中的效果。
19、在antd react table中自定义pagination样式
<Table columns={columns} bordered dataSource={dataSource} rowKey={record => record.id} pagination={paginationProps} />1. 分页器需要设置默认每页多少条pageSize1
2
3
4
5
6
7
8
9
10
11
12
13
2. **pagination分页器**
- 多使用默认值的pageSize和pageNo
1. 注意设置分页默认值
```tsx
const [pageOption, setPageOption] = useState({
pageNo: 1,
pageSize: 10
})
> 这里的total要自己定义一下 2. 切换分页1
2
3
4
5
6
7
8
9
10
11// 分页配置
const paginationProps = {
showQuickJumper: true,
showTotal: () => `共${total}条`,
total: total,
current: pageOption.pageNo,
pageSize: pageOption.pageSize,
onChange: (current: number, size: number) => paginationChange(current, size)
}3. 删除时第二页只有一条数据,跳到第一页1
2
3
4
5
6
7
8// 当前页面切换
const paginationChange = async (current: number, size: number) => {
console.log('page', current, size)
setPageOption({
pageNo: current,
pageSize: size
})
}4. 关闭弹框分页改变1
2
3
4
5
6
7
8
9
10
11
12
13
14
15
16
17
18
19
20
21
22
23
24
25
26
27
28
29
30
31const columns = [
{
title: '操作',
key: 'action',
width: 100,
align: 'center',
render: (text, record) => (
<Delete handelDet={(record) => { handelDet(record.id) }} centText='是否删除班级?' record={record} />
),
},
];
//删除学生
const handelDet = (record) => {
classDel(record).then(({ code, data }) => {
if (!code) {
//添加成功
message.success(data.message)
//判定当前页只有一条数据时,跳到第一页
if (dataSource.length === 1) {
setPageOption({
pageNo: 1,
pageSize: 10
})
//改变分页
paginationChange(1, 10)
} else {
getDataList()
}
}
})
}5. 序号排序1
2
3
4
5
6
7
8
9useEffect(() => {
return () => {
setPageOption({
pageNo: 1,
pageSize: 10
})
}
}, [quserData])
6. 动态表格序号 > {(pageOption.pageNo - 1) * 10 + pageOption.pageSize+ 1}1
2
3
4
5
6
7
8
9
10
11
12{
title: '序号',
dataIndex: 'id',
key: 'id',
align: 'center',
width: 100,
render(text, record, index) {
return (
<span>{(pageOption.pageNo - 1) * 10 + index + 1}</span>
)
}
},
20、useState返回的修改状态数据的方法是异步的
疑惑点:
2
3
4
5
6
7
8
9
10
11
12
13
14
declare interface DataType {
name: string,
age: number
}
*/
const [data, setData] = useState<DataType>();
const handleClick = () => {
setData({
name: 'xiaoming',
age: 18
})
console.log(data); //输出的结果尽然为空
}原因:这里的setData方法是异步的,可能,setData还没有执行完毕,console.log就执行了,这样就导致这里输出的data还是原来的值。
解决方案:
方案1:不使用useState来处理这个数据了
2
3
4
5
6
const newData: DataType = {
name: nameValue,
age: ageValue
}
}备注:这里的nameValue和ageValue是通过useState处理过的数据,这些数据用于实时接收对应的input框输入的数据。
方案2:在useEffect中使用这个值
2
3
console.log('data',data);
},[data])
21、在给动态绑定的函数进行传参的时候
例如:
1 | let [isEdit, setIsEdit] = useState(true); |
<a onClick={() => showModal(true)}>编辑
22、分别利用cra和vite来创建react项目
1、cra
依赖安装creat-react-app
1
npm install -g create-react-app 或 yarn add -g create-react-app
项目初始化
构建出项目名为my-react-app的react+ts项目
1
creat-react-app my-app --template typescript
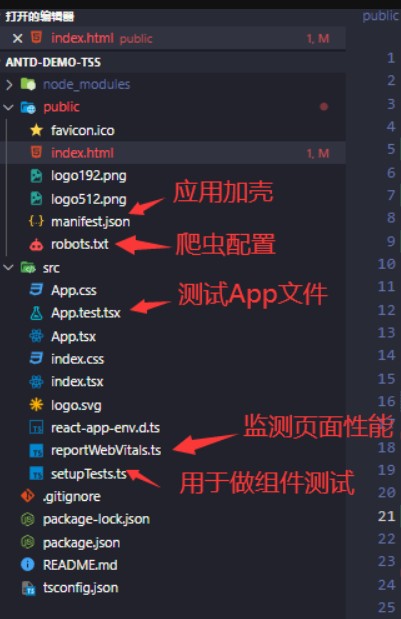
项目目录结构介绍
2、vite
创建项目
1
npm create vite@latest my-vite-app
根据个人需求进行选择
安装完成后
1
2
3cd my-vite-app
npm install // 安装package.json中的依赖包
npm run dev // 启动项目
23、RTK的使用
安装相关依赖
1
npm install react-redux @reduxjs/toolkit
具体使用
24、用于react调试的浏览器相关插件
- React Developer Tools
- Redux DevTools
webSocket
http1.0和http1.1只能单工通信,也就是客户端发请求服务端响应结果的方式;服务端无法主动推送消息给客户端
http2.0实现了双工通信
需要实时刷新的场景:
解决方案:
1.轮询: 前端定时发送请求给后端,后端进行处理;轮询适合短时间内高并发请求例如:秒杀,聊天,echart图标,消息通知
2.长连接: 保持连接状态,当数据有更新,才会主动推送
todo…
